“It’s not possible.”
That’s what Branko told me when I asked if I could connect my existing KNX smart home system to Apple Home. He told me the system was too old, and he said that upgrading it would require ripping out hardware and buying expensive new servers for thousands of Euros.
I didn’t believe him. I suspected he just wanted to gatekeep the technology to keep charging service fees, or that he’s just unaware that it’s possible.
I decided to prove him wrong. Over the course of a weekend, I went from a locked down system to controlling my entire house with Siri, using nothing but a spare Raspberry Pi and some Python.
Here is the story of how I reverse-engineered a 15-year-old Magiesta system and dragged it into 2025.
Phase 1: The Hardware Dead End
My home runs on KNX, a standard industrial protocol. Usually, you can just buy a generic KNX-to-IP interface, plug it in, and be done. I opened my electrical cabinet to see what I was working with.
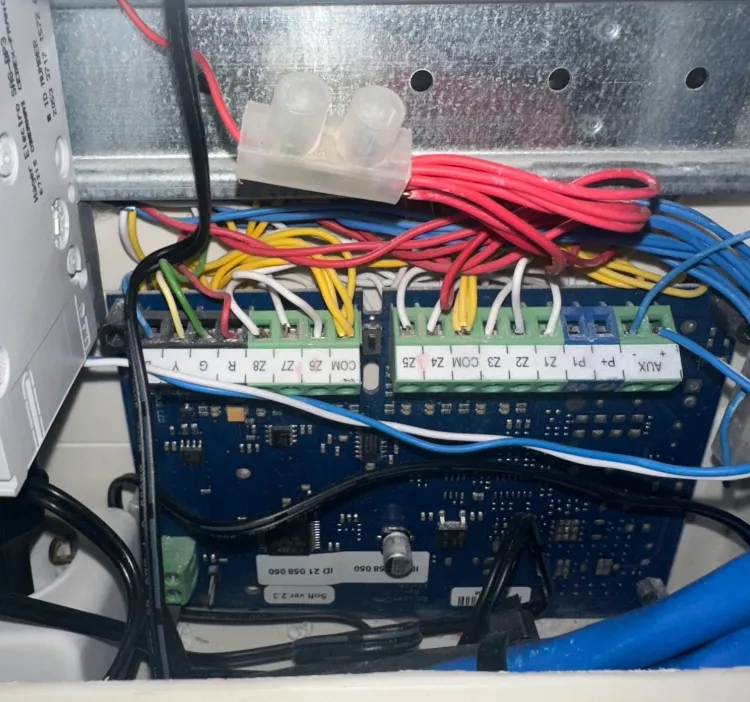
I found a Raspberry Pi 2 running the “Magiesta” server software. But I noticed a problem immediately. It wasn’t using a standard USB/IP gateway. It had a custom expansion board wired directly to the physical wall switches (Inputs Z1, Z2, etc.).
The realization: If I unplugged this old Pi to replace it with a modern one, my physical light switches would stop working, thanks Gemini. I was hardware-locked. I couldn’t touch the wires.
I had to find a software solution.
Phase 2: The “Side Door”
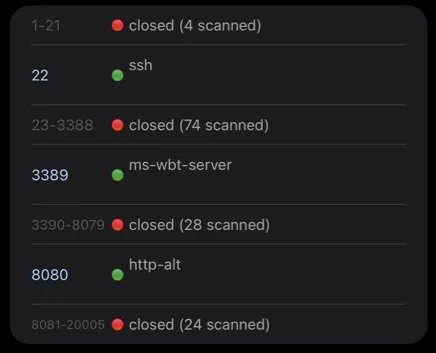
If I couldn’t replace the hardware, I had to talk to it. I scanned the device on my network. Port 3671 (the standard KNX port) was closed, the software was hogging it. However, Port 22 (SSH) and Port 8080 (Web) were open.
The SSH Attempt
Naturally, my first instinct was to try the front door. Since it was a Raspberry Pi, I opened my terminal and tried the defaults: ssh pi@192.168.x.x
I tried password: raspberry. Access Denied. I tried root / magiesta. Access Denied. I tried admin / admin. Access Denied.
Branko has actually secured the operating system. I wasn’t getting in that way. Surprising.
The Web Traffic
I moved on to Port 8080. I opened the Magiesta web interface in Chrome and fired up Developer Tools (F12). I watched the Network Tab while I clicked a light button in the web app.
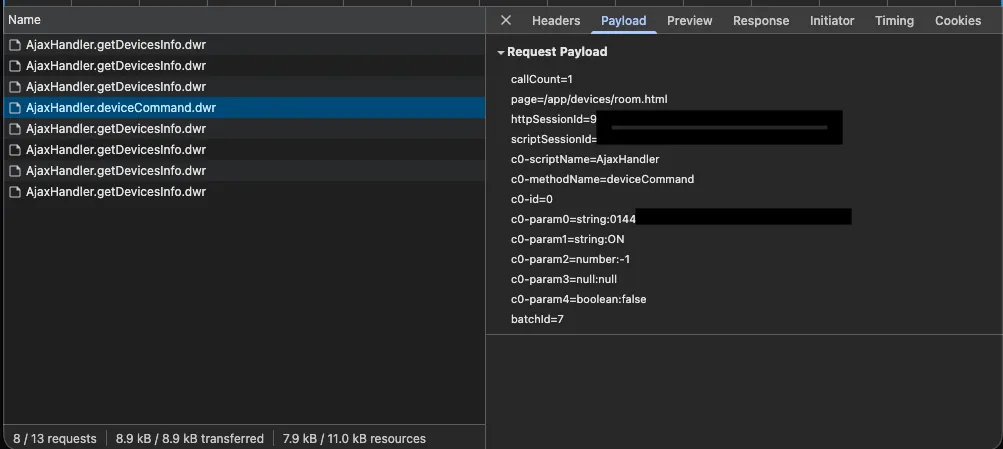
I caught a request. It wasn’t a modern REST API (like POST /api/light/on). It was a weird request to a file called AjaxHandler.deviceCommand.dwr with a payload that looked like ancient hieroglyphics:
callCount=1
scriptSessionId=6AD692C3A8463EE...
c0-scriptName=AjaxHandler
c0-methodName=deviceCommand
c0-param0=string:4092deba-b26b-4bae...
c0-param1=string:ON
A quick Google search revealed this was DWR (Direct Web Remoting), a Java technology from the mid-2000s that lets JavaScript talk directly to Java functions on the server. It’s ugly, but it’s just HTTP.
I copied that request as a cURL command into my Mac’s terminal, hit Enter, and… click. The living room light turned on.
I had a way in.
Phase 3: Reverse Engineering with Python
Turning a light on was easy, but I faced a massive problem: The UUIDs.
Every light switch had a random ID like 4092deba-b26b-4bae.... My house has 50+ devices. Clicking every single button in the web interface to capture its ID would have taken hours and been prone to errors.
I needed to automate the discovery.
1. Cracking the Login
First, I had to get in. By inspecting the HTML source code of the login page, I found the form submitted to j_acegi_security_check. This confirmed the server was using an old version of Spring Security. I wrote a Python function using the requests library to spoof a browser login and handle the session cookies automatically.
2. The Un-Minified Goldmine
I started digging into the JavaScript files the server was sending to my browser, specifically engine.js and AjaxHandler.js.
To my surprise and delight, the code wasn’t minified.
In modern web development, code is usually compressed into an unreadable mess to save bandwidth and to obfuscate it. But this system was from 2005. The code was perfectly readable, complete with comments. I could read the entire API structure like a book.
I scrolled through AjaxHandler.js and struck gold when I found a function called getRoomByOrder.
AjaxHandler.getRoomByOrder = function(p0, p1, callback) { ... }The logic was simple, the server indexed rooms by numbers (0, 1, 2…). I didn’t need to know the IDs, I just needed to ask for “Room #1,” then “Room #2,” and so on.
3. The Loop
I wrote a loop in Python to brute-force the house structure:
all_data = {}

# Loop through indexes 0 to 20 to find every room in the house
for i in range(20):
    # Ask the server: "Does Room #i exist?"
    room_uuid = get_room_by_order(session, i)

    if room_uuid:
        # If yes, download every light and blind in that room
        room_devs = get_devices_info(session, room_uuid)
        all_data.update(room_devs)
        print(f"Found Room {i}: {len(room_devs)} devices")
When I ran this script, it was magic. It cycled through the numbers and printed out a complete inventory of my entire home, UUIDs, names, and types.
4. Parsing the Garbage
The server returned data in raw DWR JavaScript format (s0.id="..."; s0.value="ON";), not JSON. I used Python’s Regular Expressions (Thanks Gemini) to strip out the syntax and merge the IDs and Values into a clean dictionary.
# Extracting the raw data into a clean dictionary
for match in re.finditer(r'(s\d+)\.(humanValue|value)\s*=\s*"?([^";]+)"?', r.text):
var_name = match.group(1)
value = match.group(3)
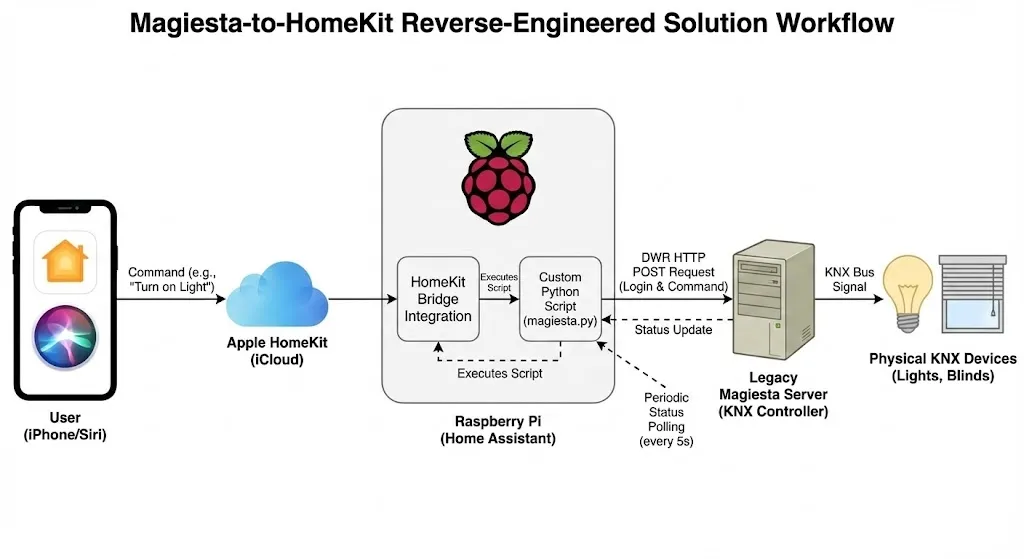
devices[uuid] = str(value).replace('"', '')The result was a script (magiesta.py) that could log in, map the house, and output the status of every single device in a format Home Assistant (the open source software that will act as a bridge with Apple Homekit) could understand.
Phase 4: The Infrastructure Pivot
Now I needed a place to run this script 24/7.
I first tried running Home Assistant on my Mac Mini using virtualization. It was a disaster of driver issues and boot loops. I realized I was overcomplicating it.
I remembered I had a spare Raspberry Pi collecting dust in a drawer. I flashed Home Assistant OS onto an SD card, plugged it into the router, and walked away. Ten minutes later, I had a server running. No drivers, no VMs, just a box in the cupboard.
Phase 5: The “Grand Unification” in Home Assistant
I didn’t use a standard Home Assistant integration because none existed for this 15-year-old system. Instead, I built my own integration using YAML configuration to create a “Brain and Hands” architecture.
The Brain (The Sensor)
I set up a single command_line sensor that runs my Python script every 5 seconds. It acts as the central “brain,” dumping the status of the entire house into one big JSON attribute.
command_line:
  - sensor:
      name: "Magiesta House Status"
      command: "python3 /config/magiesta.py"
      scan_interval: 5
      json_attributes:
        - data # The entire house status lives here
The Hands (The Switches)
Then, I created “Template Switches” for each light. These don’t poll the network themselves, they just read the “Brain” sensor. This makes the system incredibly fast and prevents overloading the old legacy server with too many requests.
switch:
  - platform: template
    switches:
      living_room_light:
        # Check the 'Brain' sensor to see if this light is ON
        value_template: "{{ state_attr('sensor.magiesta_house_status', 'data')['4092deba-b26b...'] == 'ON' }}"
        # Send the command to turn it on/off
        turn_on:
          service: shell_command.magiesta_cmd
          data: { cmd: "ON", uuid: "4092deba-b26b..." }
I hit one final snag with the blinds. I assumed the command was “UP” or “DOWN.” Nothing happened. Another look at the Network tab revealed the server demanded the specific words “OPEN” and “CLOSE”. One quick YAML edit later, and the blinds were moving.
Phase 6: The Apple Home Victory Lap
With the hard work done in Home Assistant, the final step was trivial.
- I added the native HomeKit Bridge integration in Home Assistant.
- I selected the “Switch” and “Cover” domains to expose.
- A QR code popped up on the screen.
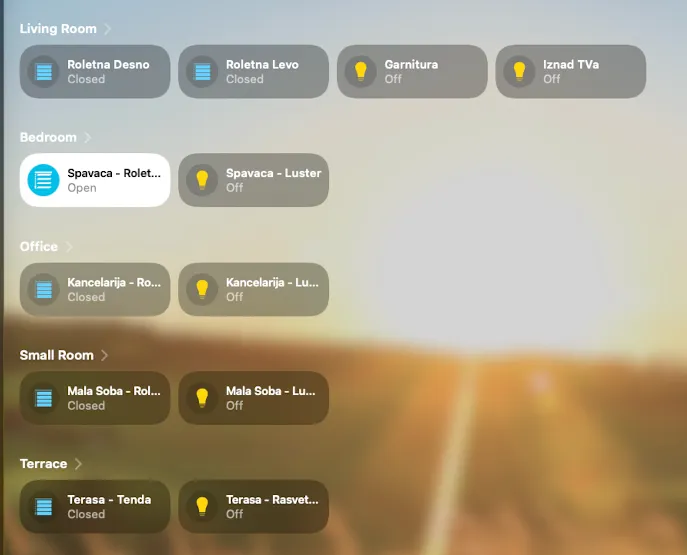
- I scanned it with my iPhone. Instantly, lights, blinds, and thermostats populated in my Apple Home app.
The Result
- Branko’s Quote: “Impossible” / Thousands of Euros.
- My Actual Cost: €0
- Time Spent: One very satisfying weekend.
The lesson? Proprietary systems aren’t dead, they’re just speaking languages we forgot. Also, don’t trust Branko.